
Brock Moisture Sensor Service Tool (MSST)
Operator Instruction Manual
Table of Contents
o Overview
o Diagnosing Sensor Communication Problems
o Updating Moisture Sensor Firmware
o Performing Empty Ratio Calibration
o Appendix A: Troubleshooting MSST
o Appendix B: Editing Empty Ratio - example
o Appendix C: Updating MSST Software
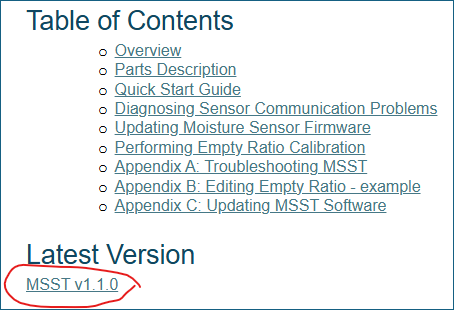
Latest Version
Overview
The MSST talks to any moisture sensor (new flat or drawer) independent of the control system (Intuidry, Quantum) to:
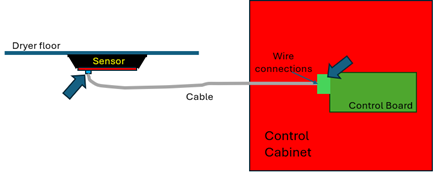
1. Help quickly isolate whether communication issues are the sensor, the cabling or the control system. It shows the values the sensor is communicating and when the sensor is not communicating and indicates if the sensor software has been corrupted and is ready to be updated. The device can be connected to the dryer cable that goes to the moisture sensor or to the sensor directly.
2. Update the sensor firmware. This is especially valuable for Quantum systems that can’t otherwise update the sensors. It can also be valuable for updating stock of sensors at the shop.
3. Perform an empty ratio calibration (not a moisture calibration). This is especially valuable for Quantum systems that can’t otherwise calibrate the empty ratio to improve the stability of the moisture sensing accuracy (as reinforced at dryer service school for Intuidry).
4. The display has 3 buttons for navigating screens and actions. The lower edge of the display indicates the function of each button for that screen.
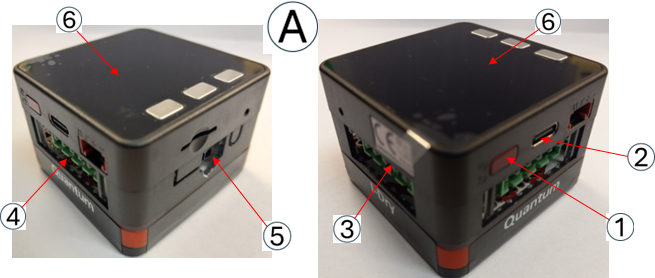
Parts Description
A. MSST device (1)
1) Power button (press twice to shut off, once to turn on or restart)
2) Port for USB-C cable (charging and data transfer)
3) Port for connecting to Intuidry moisture cable connector
4) Port for connecting to Quantum moisture cable connector
5) Port for connecting “Pigtail” cable
6) Display with buttons (left, center, right)
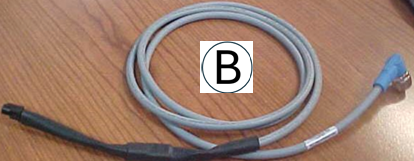
B. Pigtail cable (1)
C. 4-pin dryer moisture cable connector (aka Phenix connector) (1)

Quick Start Guide
Charging
· Attach a USB-C cable (not provided) to the MSST and to a charger or device that provides a charge (laptop, computer, tablet) to charge the internal battery.
· If the battery indicator is not HI, it needs to be charged.
· The battery is usually sufficient for 5-7 downloads. (Carrying a USB-C cable and charger with the device may be valuable)
Power On / Off
· Power on: press the RED power button on the side (it takes a few seconds to power up). A single “tick” sound from the display at powerup is normal.
· Reset: same as power on.
· Power off: double press the RED power button on the side.
· The MSST turns itself off after 5 minutes without user interaction, except while updating sensor firmware.
· The device powers up to the Sensor Status screen.
Sensor Firmware Update
1. The “Update” button on the Sensor Status screen leads to a screen that presents the current version, allows one to select and confirm the update choice. (See the section Updating Moisture Sensor Firmware for more details.)
Empty Ratio Calibration
2. The “ER Cal” button on the Sensor Status screen leads to a screen that allows one to prep their sensor for Empty Ratio calibration before pressing “Auto Cal”. (See the section Performing Empty Ratio Calibration for more details.)
Diagnosing sensor communication problems
|
MSST connection |
Communicating |
Not Communicating |
Comment |
|
Directly to the sensor |
Sensor is not the issue |
An issue with the sensor. If Status is “Pending Update” the sensor firmware has been corrupted and the sensor is ready to be updated with the MSST. |
Using pigtail cable or a known good cable to make connection. |
|
Intuidry dryer moisture sensor cable at the CPU board. 4-pin green block connector plugged into the “I-Dry” slot |
Sensor and cable are okay. Possibly a CPU board issue |
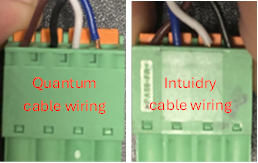
An issue with the sensor or cable or wires into the green block connector or is plugged into the wrong slot. (See picture below showing wire color locations) |
|
|
Quantum dryer moisture sensor cable at the Slave board. 4-pin black or 4-pin green block connector plugged into the “Quantum” slot |
Sensor and cable are okay. Possibly a Slave board or comm chip issue |
An issue with the sensor or cable or wires into the green block connector or is plugged into the wrong slot. (See picture below showing wire color locations) |
IF the sensor connects to the slave board with a connector larger than 4-pin, carefully transfer the wires to the corresponding terminals of a 4-pin connector, such as the one provided. |
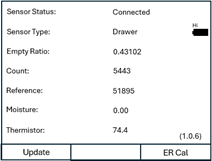
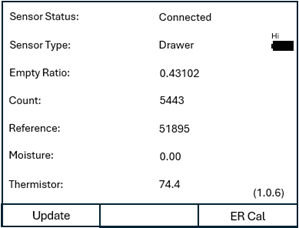
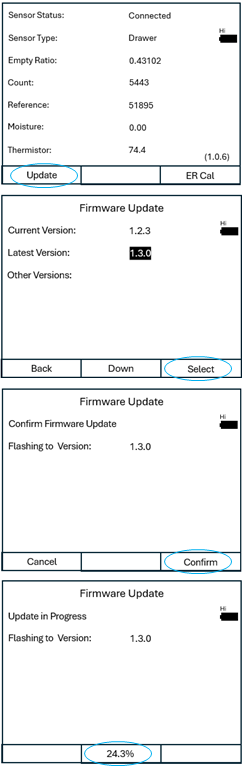
Communicating:
![]()
· Sensor Status “Connected”
· Sensor Type “Drawer” or “Flat”
· “Empty Ratio”, “Count”, “Reference” and “Thermistor” will have non-zero values and count changes continually.
Updating Moisture Sensor Firmware
|
|
1. Connect the MSST to the targeted moisture sensor by one of the following: · By dryer sensor cable (plug into correct connector; I-Dry vs Quantum)
o There is a spare 4-pin phoenix connector in the kit in case the Quantum sensor cable is attached to a larger connector, such as a 12-pin. If so, transfer the wires to the 4-pin connector in the same order as they were on the 12-pin connector. (The rounded features need to be oriented the same way to get it right) · By pigtail cable directly to sensor 2. Turn on the MSST · Press red button on the side of the MSST to turn it on. · The device will power up after a few seconds with the Sensor Status screen. Status is not instantaneous but within 5 seconds will properly reflect what it sees (or doesn’t see). Statuses: o “Connected” – live sensor information follows o “Disconnected” – Nothing is responding to MSSTs efforts to talk to a moisture sensor. o “Update Pending” - the moisture sensor is actively listening and ready to be updated. 3. Press the left display button (below “Update”) to go to the Firmware Update screen. · The Current Version of firmware in the sensor is displayed. This is “Unknown” if the sensor status is “Update Pending”. · Note that if this information is only accurate as long as the sensor remains connected, otherwise one must return to the Sensor Status screen again to get accurate information. 4. “Select” the latest version (or an older version by looping through options with the “Down” button if older versions are loaded) or go “Back” to the sensor status screen. 5. “Confirm” the choice to begin updating or “Cancel” to return to the Firmware Update version selection screen. 6. The download will start after a couple seconds. The update progress will be shown at the bottom center. When it finishes (100%) it goes back to the Sensor Status screen.
|
Performing Empty Ratio Calibration
|
|
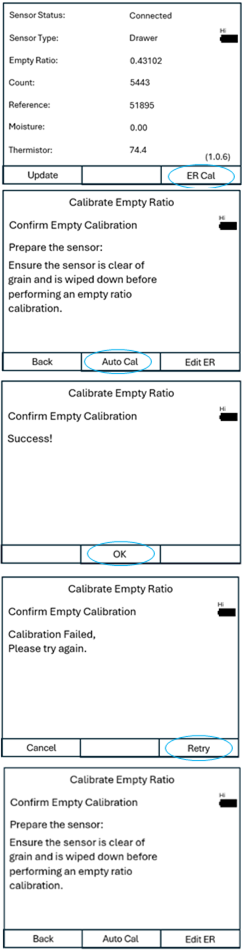
1. Connect the MSST to the targeted moisture sensor by one of the following: · By dryer sensor cable (plug into correct connector; I-Dry vs Quantum) · By pigtail cable directly to sensor 2. Turn on the MSST · Press red button on the side of the MSST to turn it on. · The device will power up after a few seconds with the Sensor Status screen. 3. Press the right “ER Cal” button. 4. Prepare the moisture sensor. For a proper Empty Ratio calibration, the sensor must be in its installed position but must be clear of grain and debris and wiped down. 5. Press the “Auto Cal” button to initiate the calibration. Success is usually instantaneous. 6. If it succeeds “OK” goes back to the Calibrate Empty ratio screen. 7. If it fails, verify the connections and retry.
|
Appendix A: Troubleshooting MSST (table)
|
Problem |
Potential Cause |
Solution |
|
MSST doesn’t turn on (or doesn’t stay on) |
Device powered itself down. |
Press the red button and wait several seconds for it to start up. |
|
‘’ |
Battery in the device is drained. |
Charge the device with a USB-C cable. |
|
MSST is not communicating with the sensor. |
The sensor is the old type of flat sensor (metal cover). |
The MSST doesn’t currently talk to old type (metal covered) flat sensors. On the Intuidry HMI “Sensor Status Screen” this type of sensor is called “Old Flat” |
|
‘’ |
The dryer sensor cable is plugged into the wrong slot (I-Dry vs Quantum). |
Connect the Intuidry moisture sensor cable into the “I-Dry” slot and the Quantum moisture sensor cable into the “Quantum” slot (picture in Parts Description section) |
|
‘’ |
The MSST is frozen |
Restart the MSST by pressing the red power button. |
|
‘’ |
More than one sensor is connected. |
Disconnect all but one sensor. |
|
‘’ |
Won’t talk to known good sensor through ANY cable even after restart. |
MSST is bad. |
|
MSST doesn’t charge with my USB-C cable |
The USB-C cable isn’t actually USB-C but a similar cable (won’t actually fit properly) |
Use a USB-C cable. The USB-C cable has an oval end. |
|
‘’ |
The other end of the cable isn’t providing charge. |
Plug the other end into a charger or a device that provides charge (computer, tablet, charge bank, etc.). |
|
MSST doesn’t charge with my USB-C cable (continued) |
USB-C cable is broken or intermittent (this is common with a lot of bending) |
Replace the USB-C cable and try again. |
|
Empty Ratio saved is lower than the valued edited |
Edited value was above a reasonable value and rejected by the sensor. |
Perform Empty Ratio calibration (“Auto Cal”) for a reasonable value. |
|
Empty Ratio saved is higher than the valued edited |
Edited value was below a reasonable value and rejected by the sensor. |
Perform Empty Ratio calibration (“Auto Cal”) for a reasonable value. |
|
Computer does not find the MSST to update it. |
The USB-C cable is a charge-only cable, not a data cable. |
Replace the USB-C cable with one whose packaging uses terms like “data cable”, “USB 3.0” or “USB 3.2” |
Appendix B: Editing Empty Ratio

Editing the Empty Ratio is not recommended. Please use Empty Ratio calibration instead.
Edit Empty Ratio is included as a tool for Brock technical support for highly unusual circumstances.
1. From the Calibrate Empty Ratio screen, press the “Edit ER” button.
2. Move the cursor to the digit to be changed by pressing the “Next” button.
![]()
3. When the cursor is at the digit to change, press “Select” to choose that digit for editing. The cursor changes to edit mode.
![]()
4. Press the “Up” / “Down” buttons to change the value of that digit.
5. Press “Select” to return to digit selection cursor, where you can move to another digit (“Next” button) or indicate “Done”. “Done” returns you to the Calibrate Empty Ratio screen.

Appendix C: Updating the MSST software
The MSST has been designed to be easily updated with new software. This is done via a USB-C data cable connecting the MSST to a Windows computer.
New versions of the tool software will be available on MSST.BrockControl.com home page by clicking a link to start downloading such as shown here to download it to your “Downloads” folder. Then follow the steps below.
- Connect the MSST to the computer with a USB-C cable.
- Double-click the downloaded file on your computer.
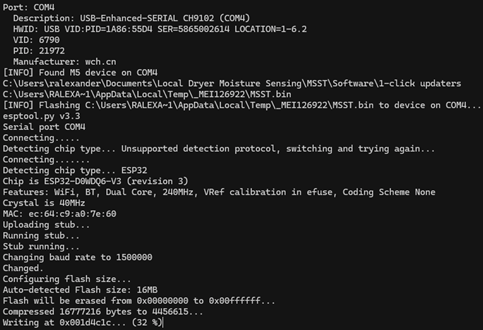
- The program will launch a window that shows the progress as it finds the connected MSST then shows % progress as it sends info to the MSST, and finishes the job after ~120 seconds. Example showing 32% progress
- If the window launches and quickly closes, it likely didn’t find the connected MSST. If so, try plugging the USB-C cable directly into a USB port on the computer (not through a port expander).
- Once fully transferred it may take 20 seconds before the program completes and closes the window it launched.
- The MSST will start up and you should see on the main screen that the number in parentheses (lower right) has changed to the new version.
NOTE: If your computer pops up a security warning as shown here, select “More info”. If it then shows the MSST update file, select “Run anyway”.
 “More Info”: